
Do you need a solid gallery hanging system, but you are short on money? In this DIY tutorial, you can build one for less than half the cost of a professional art gallery hanging system.
You just need to be willing to invest some extra time to put the raw materials together to DIY (do it yourself).
A gallery hanging system is the best way to display art because it’s flexible. You can change spacing, height and even quantity of artworks quickly without perforating a wall with holes. I needed to hang art on two walls in a coffee shop and calculated that a professional system employing a molding trim rail would cost about $260.
Inspired by the design, but deterred by the expense, I decided to “bootstrap” and make a system. For my installation, material cost was only $116.58, not including paint for the rail and wood putty for filling holes.
*The hooks are one of the biggest costs of the pro system and with good reason; they are ingenious! The professional hooks adjust easily with the push of a button, sliding up and down the hanging wire, locking in place when the button is released. My DIY solution: terminal lugs from the electrical supply section of the hardware store! A set screw locks the lug to the wire rope. I even bent the tabs to form hooks. It takes a bit more time to hang your art with these, but they are solid and a fraction the cost.
Here’s the DIY art gallery hanging system recipe:
- Pine “bed” molding for rails
- 1/16” wire rope
- Aluminum grommets for 1/16” wire
- Brass corner braces for rail hooks
- Small copper terminal lugs for art hooks
- Paint and wood putty for trim
- 6 penny 2” finish nails and 2” screws for trim
- Here’s the method, in brief:
1. Prepare trim rail: Mark your walls where you want the rails to be. After cutting your molding to desired length, pre-paint to speed installation. You can fill nail holes with putty afterwards.

2. Install molding rail: With finish nails, counter sinking the nail heads. Then, pre-drill holes through the rail into the wall studs and secure with 2” screws so the rail will bear weight.

3. Make your hangers: Have lengths of 1/16” wire rope cut to length at the hardware store. I used 6’ lengths. Bend brass corner braces to form the rail hooks. If you want to avoid the bending process, substitute larger “S” hooks. The brass hooks I fashioned hang close to the wall, a plus.

Thread an aluminum grommet onto the wire, run it through the bottom of your rail hook and back through the grommet to form a small loop. A couple taps of a heavy hammer will set the grommet. Just watch your fingers!
4. Make your art hooks: Take the copper terminal lugs and turn around the tabs so they will pinch the wire rope tightly when the set screw is tightened. Thread onto the wire. You’ll notice the tabs have a hole where you could use an “S” hook. I simply bent the tab to form a hook using two sets of pliers.


5. Place the finished hangers onto the rail:

6. Hang the art: Hang and adjust the terminal lugs as needed.

Two items of note: For a bit more security, attach your art to the hook by running a zip tie around the hanging wire on the frame and the wire rope. To hide excess wire rope, loop wire until it is in back of the artwork and secure with blue painters tape, which will keep sticky residue from accumulating on the wire.
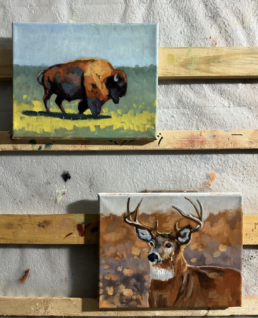
This system is in Coffeeberries, a Londonderry NH coffee shop that has just expanded. I’m curating artworks through a program we’ve created to give local high school students real-life experience as established artists. Their works are for sale with all proceeds going to the students. Also pictured here are a couple pieces by artist Michael James Toomy, a supporter of the program. The long term mission is to partner small businesses with artists, increase exposure for all and fill the community with art!
This post is in no way meant to discourage you from buying a professional gallery hanging system. You do get what you pay for: a quality, innovative way to hang art securely and quickly. I recommend that if you want to hang more than a couple dozen pieces, you’ll want to go pro. Someday, I hope to do the same.
*****
Guest author Andy Mack Jr. writes and consults for NH Arts, Culture & Business. His subject matter runs from New Hampshire life, to local business, marketing, and angling. He is passionate about content, art, music, food and local culture.
http://www.andymackjr.com/
Student art program http://www.visitlondonderry.com/arts-entertainment/student-art
Michael James Toomy http://www.londonderryfineart.com/


Thank You so much for this!! I live in Bermuda and I would have had to order a gallery system online which would have been so expensive after adding in shipping and duty. But with the above I can easily go to a hardware store and buy these items to do it myself! Thank You!!
Hi Vanessa, it’s fun to see you here again. I’m so glad you can use this tip! Let me know how it works for you.
Lori
Lori,just wanna say-this definitely looks like a cheap and super effective way of hanging some fine art,not letting it get trashed.
Always a very informative blog,keep up the good work.
Thanks for the great feedback!
Lori
Thank you so much Lori! I am an artist showing at a local bakery here in So Cal, and they aren’t happy about all the nail holes in their wall, so I am going ahead with your DIY project.
I am very confused about the terminal lug part, though and wonder if you can help:
You wrote: “Take the copper terminal lugs and turn around the tabs so they will pinch the wire rope tightly when the set screw is tightened.” What tabs, and how do I turn them around? With pliers? Is this shown in your photos? (They appear to look the same as when they were in the package…)
Also, I am confused about how to actually hang the painting onto the terminal lug :hook”. I don’t see anything to hook them too in your photos. What am I missing?
Thanks in advance for your time and for sharing this valuable information. Great website!
– Nancy
Great news Nancy! I am so happy this post is useful to you.
I will contact the guest author with you question and will have him reply. Thanks for your patience!
Good luck,
Lori
Doh! My apologies — I did not notice the “guest author” at the bottom. (I wondered how you had a show in NH, after reading your bio….) Sorry about that.
I think I have it all figured out! In case anyone else reading this blog is having trouble, too:
The terminal lugs actually are made up of two different parts, (it helps to actually open the package and take it out!) which you can separate by unscrewing the screw within. Then you just flip over the “tab” (the strip) without taking it out of the “square part of the lug. Then insert your wire, screw the screw back in super tight.
I haven’t yet tried to bent the whole “tab” with pliers, but by enlarging the photo in your blog, I now see that the author has straightened the tab (i.e. taken the “L” shape out of the tab), and then bent the end of it into a “V” to make the hook upon which to set your painting wire.
Thanks again, Lori AND ANDY! This is really ingenious – I don’t know HOW you figured this out, but I am truly impressed.
Thank you!!! I was able to apply many of your tips to set up a gallery setting on propanels. Saved my about $150!
Hello Michelle! Glad this post was helpful to you. I’d love to see photos!
Lori 🙂
this will work perfect in my store. thank you
cardinalphonerepair.com
Happy to help! Thanks and good luck Mike…
Thanks Lori! I have the brass “monkey hooks” system and they keep sliding–especially with heavier framed paintings and they are EXPENSIVE. Have to try this!
Kathryn
Great Kathryn, I hope this system works for you!
Like many of you, was interested in eliminating all the wall holes and swapping out art on a regular basis. But I’m cheap – really cheap – so was really happy to find this post.
followed the directions closely, and even though i build things all the time it did take a little trial but fortunately not much error. VERY happy with the result. did learn a few things along the way:
– Pine “bed” molding for rails – Home Depot has it, but it isn’t primed. my local hardware store did have it primed – big time saver. make sure to mount LEVEL along long runs with the fat rounded end up – i just screwed it directly into the studs
– 1/16” wire rope – available as well at Home Depot – i bought 100′ @ 21cents a foot, and cut it to length at home with end nipper cutting pliers – nice clean cut to easily thread thru grommets (without a clean cut this step is MADDENING!!!!!). typically cut the pieces to 4′ to hang art above chair rail (this is for a basement) – just circled excess wire and tucked into backside of piece
– Aluminum grommets for 1/16” wire – these come in a nice two pak at Depot as well (1/16″ ferrule & stop set) – went assembly line style to attach to the corner braces – threaded the wire thru one side of the ferrule, up through the bent corner brace hole, and back around through the other side of the ferrule. MAKE SURE TO CLOSE DOWN THE SIZE OF THE CIRCLE-BACK here . . . nothing worse than a 3″ long hangar length! when thru and adjusted, just gave it a very firm press with a set of channel locks to cinch tight (squeeze from the end to maximize force – was using 12″ channel lock tool here) – make sure to gently check if the cinch took – i had one or two pop out and had to start over 🙁 Overall, quick and easy once you do it a few times (i made 16 of these to start – some art pieces need two hangars v one due to center bracket in frame and size of piece)
– Brass corner braces for rail hooks – used pre-bent 90 degree 1″ stainless angle braces instead. can get a 4pak at Home Depot for about $4 – still much more economical than online art gallery hooks. set my channel locks to the desired end result bend position and just cranked them out like an assembly line. did this before attaching to wires. also found some really cool moulding hooks online if you have the $$$ to burn and the patience to wait for the order (not my immediate gratification strength) some folks have talked of using S hooks as well – didnt even consider it as the wires & grommets are really cool
– Small copper terminal lugs for art hooks – to me initially the most confusing part of the setup. in the picture in this article, they are Thomas & Betts “Blackburn” Terminal Lug #BTC0208-B2 – about $3 for a two pack at Depot. there is actually a bit smaller model BTC0614-B2 (2 pak $2) that seems to works a bit better as it smaller. if you have a nice table-mounted vise, it is invaluable in shaping the lug piece that becomes your wire hangar hook – just unscrew it from the housing cube, flatten it in the vise (took two steps), screw back into housing, then bend at the circular opening to make the hook. used both the vise and channel locks to craft the perfect final wire hangar angle. again – assembly line city!
hope that was more clear than confusing. if i knew how to send pics i would. always happy to answer any questions as well
rob
Wow! What a generous comment you have left us here Rob. Thank you for sharing your tips. I would love to see a photo of your hanging system. please email them to me lori@lorimcnee.com This could be a great guest post! Cheers, Lori
My wife found your web site. The way you are hanging the pictures is a really good idea. I modified your instructions slightly. I used a 3/4 inch copper tube strap, plumbing department, bent one end and attached the wire to the other end. The twisted 1/16 inch cable was in the hardware department, I used 3 feet of cable for each hanger. Instead of using the expensive ferrules, I used very inexpensive crimp splices, electrical department, I removed the yellow covering, and slid it over the cable. I then bent the cable 1 inch from one end, ran it through the hole of the copper tube strap and back into the crimp splice, used pliers to crimp. For the picture hanger I followed Rob’s instruction. The copper tube strap really sets of the hanger, the oak molding and it has a nice curve.
Happy to hear this blog post helped you and your wife. I would love to see your spin on these directions. I like the sounds of the copper tubing. I bet it looks great! Many thanks for sharing your feedback with us.
Happy hanging,
Lori
This is brilliant! I work for an educational art program and I’m in the process of adapting this for our art show. I wanted to utilize this idea, but the thing is we are showing in long hallways and multiple rooms where the exhibition is very temporary. I was trying to figure out how to attach this system to the drop ceiling when I discovered Extruded U-nuts at our local hardware store! Instead of installing and hanging a rail, I can loop the cable around the U-nut and clip it to track of suspended ceiling closest to the wall. The U-nut has a hole where I can put in a socket screw to tighten it against the ceiling track if I want, but it seems pretty good for now.
Hello Dan, I’m glad this post is helpful to you. Thanks for adding your extra information about the U-nut. I’m sure it will be helpful to the others try this out!
Do you know about how much weight the terminal lugs have been able to hold? Thanks and look forward to using your idea. Will save so much money!
Doug, I do not know that answer. I would ask at the hardware store…
Hi Lori,
This is really relevant to your post and I hope you will highlight it in some way.
You cite in your post that it would cost $260 buying the parts online to make your hanging system. I would imagine that you did not find us. At MBS we make hanging systems and our cost to outfit this shop would be about the same cost as your DIY parts and ours are made specifically for the industry and look amazing! Please consider sharing us with your readers. http://mbs-hanging-systems.com/art-hanging-systems.html
Thanks for sharing the added ideas for hanging art!